Watch it all in 8 minutes
PowerPack is a software package containing plug-in modules for your EMG system,
designed to optimize the examination workflow and minimize the time spent on setup.
PowerPack includes an extensive "Application Setting", including detailed Test Menu Protocols
for 18 disorder groups.
A large set of Normal Reference Limits are (optionally) included which indicates abnormal findings immediately.
A Help module shows electrode placement images for current nerve/site during examination, along with a method description.
Matching Report Template and Nerve Conduction Data Summary templates are included to make the setup complete.
PowerPack is compatible with the following EMG systems:
The follow steps are required for a complete order, installation and activation procedure:
- Note: Ensure to be logged in to Windows as the user who is going to use the program,
since the installation/activation is done per user.
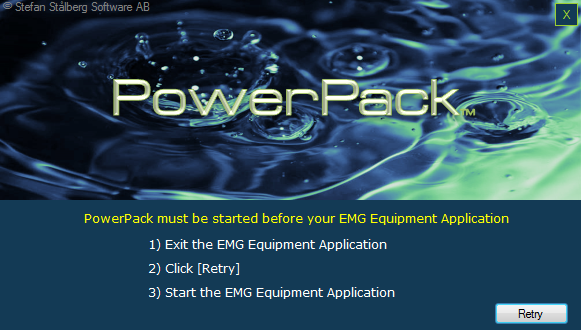
- Exit the EMG system application if running. PowerPack must always be started before the EMG equipment application. If not, a warning message will be shown:

Exit the EMG system application and click [Retry].
- Visit Order and order the number of licenses you need.
- You will receive a Product Key in an email, required to activate the program.
- Download the PowerPack installer package from Download
Many Internet browsers will warn about a downloaded installer file for safety reasons.
Confirm and accept to keep the downloaded file. In Chrome you need to click the 'Keep' alternative.

- Click on the downloaded file to start the installation procedure.
- Follow the screen instructions

- After completed installation, PowerPack is automatically started.
At first startup after installation, the Activation window is seen.
To continue, the program must first be Activated using either Online or Offline activation.
-
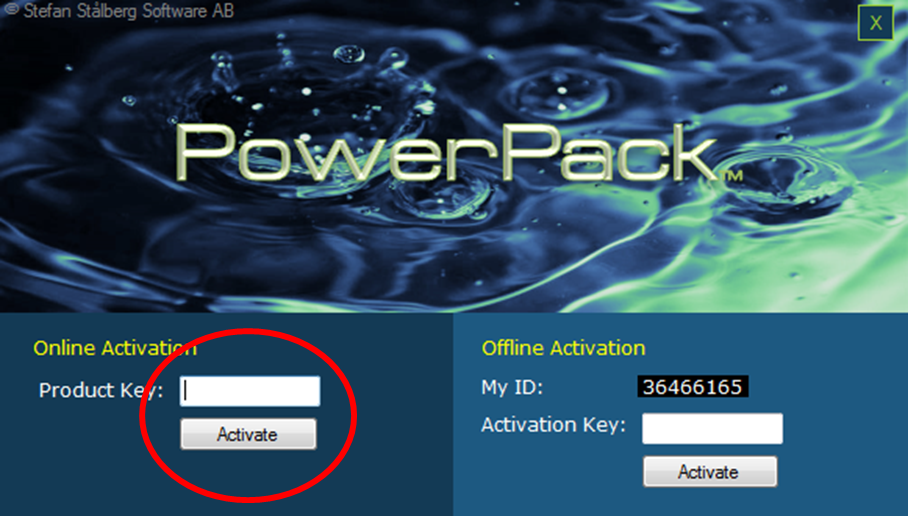
Online Activation may be used if Internet is available.
Insert the Product Key you received from Stalberg Software, in the lower left area and click [Activate] just below.

-
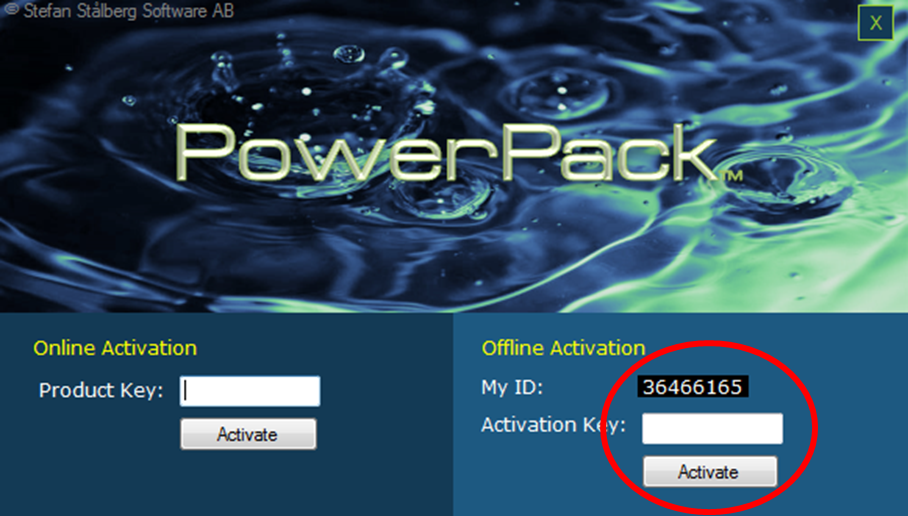
Offline Activation is used if Internet is not available from the computer where the program is installed.
- Visit Stalberg Software Activate page from another, Internet connected device.
- Insert the ProductKey and the MyID code manually and click [Get Activation Key]
- An Activation Key is shown.
- Insert the Activation Key and click [Activate] (lower right area).

- If correct codes are entered, the program is activated and continues.
A ProductKey can only be used once.
An Activation Key is unique for one computer.
In case of hard drive crash or computer replacement, please Contact Stalberg Software for instructions.
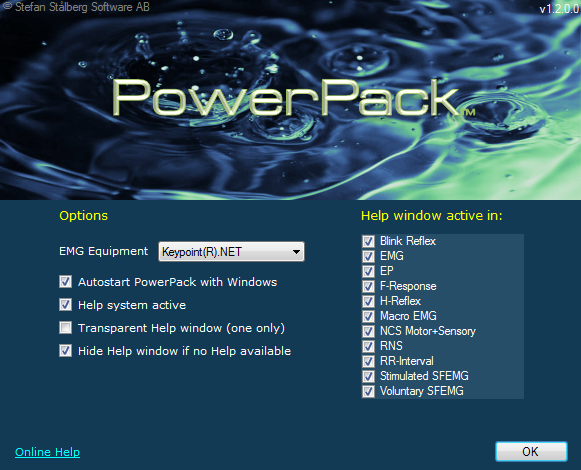
- The Help Window Options dialog is shown (see below).
Install PowerPack settings in Keypoint®Net
When a new version of PowerPack is installed, new Resource files are unpacked and placed in the Users Documents Folder (See Files and Folders).
Some of the files need to be installed manually in the EMG system.
The following message is shown when new or updated Resources files are detected.

- Note the path to the resource file and click [Ok].
- Start Keypoint®Net
Install PowerPack Application Settings:
- Go to [Options] - [Applications] to view the Applications List
- New version: If PowerPack is already installed, the previous PowerPack Application Settings version needs to be either deleted or renamed.
Delete:
- Right-click on the PowerPack application setting and select 'Delete'
Rename:
- Right-click on the PowerPack Application Setting and select 'Copy'
- Double-click on *PowerPack
- Edit the name to something else than PowerPack
- Click 'Application List'
- Right-click on 'PowerPack' and select 'Delete'
- Right-click somewhere inside the Application List area, but not on an existing Application Setting.
- Click Import and select the file PowerPack#.pcl located in the User Docements Folder (see Files and Folders).
Install PowerPack Nerve Conduction Data Template (NC Data report):
- Go to [Options] - [System] - [NC Data]
- New version: If PowerPack is already installed, the previous PowerPack NCData version needs to be deleted.
Delete:
- Right-click on 'PowerPack' and select Delete
- Right-click somewhere inside the NC Data List area (upper left window), but not on a row with text.
- Click Import and select the file PowerPack#.ncd located in the User Docements Folder (see Files and Folders).
- Right click on the 'PowerPack' template and select 'Activated by default'. Active NCData template will be seen in bold.
Install PowerPack Report Template:
- Go to [Options] - [System] - [Report]
- New version: If PowerPack is already installed, the previous PowerPack Report version needs to be either deleted or renamed.
Delete:
- Right-click on the PowerPack Report and select 'Delete'
Rename:
- Right-click on the PowerPack Report and select 'Copy'
- Click on *PowerPack
- Edit the Report Name to something else than PowerPack
- Right-click on 'PowerPack' and select 'Delete'
- Right-click somewhere inside the Reports area (upper left window), but not on an existing Report.
- Click Import and select the file PowerPack#.wrs located in the User Docements Folder (see Files and Folders).
Examination protocols / Test Menu
The PowerPack Test Menu is divided in three parts; 1) Disorder protocols, 2) Nerve protocols and 3) Individual tests.

The full Test Menu contents :

Disorder
Protocol workflow:
1) Select Protocol from Test Menu.
2) All tests in selected protocol are displayed at the top row and in a right side drop down window.
3) A Test contains one or more sites (eg. wrist, elbow...). Examine all sites in the Test.
4) Click the
[Next Test] button.
5) Repeat #3-4 until the entire protocol is completed.
It is perfectly fine to switch Protocol in the middle of the examination.
In that case, a new set of tests will be listed on the top row.
Curves and results from already performed tests will be shown, i.e. only additional test need to be performed to fulfil the newly selected protocol.

Nerve Protocols contains multiple Tests for one nerve, for improved workflow

When ordering PowerPack, you may choose to include an extensive standard set of Normal Reference Limits for free, or alternatively have your own reference limits inserted.
Please
contact Stalberg Software if you would like your own reference limits inserted.
Show all Normal Reference Limits included in PowerPack
Obtained data will immediately be compared with corresponding normal limits and indicated on the screen and in reports using
Red=value is abnormal, and Green=value is normal.
Note: Patients gender, age and height must be inserted for reference limits to work.
Below is an example of Nerve Conduction data table during recording.
Light green=normal. Red=abnormal.
Dark green indicates 'super normal', i.e. value is more than 2SD outside normal limits, but on the normal side.
This can be used as a reminder to check marker settings.

Normal values for MultiMUP and Interference pattern analysis. The outer squared box is the normal are for individual motor unit potentials.
The inner green box is the normal limits for the Mean-Durations vs Mean-Amplitude.
The green cloud (right image) is the normal area for interference pattern analysis (Turns/Amplitude).

A graphical summary of Nerve Conduction data.

In reports, values are colored red (abnormal) and green (normal) if reference limits exists, otherwise values are shown in black.

The Help window is displayed in acquisition views, offering Help information for currently selected Protocol, Test and Site.
It is a floating window on top of the EMG system application, and may be resized by click-drag in a window border.
It may be repositioned by click-drag in the header area.
For each View type (NCS, EMG etc.), the Help window will be positioned at the last used position.
Click on the top row icons to select type of Help information:

|
- Show Test information, e.g. electrode placement image for selected site./>
|

|
- Show Method description for currently selected test, e.g. nerve.
|

|
- Show Internet help for currently test.
|

|
- Show Protocol/Strategy help for currently Protocol.
|
 
|
- Select page if multi-page help information
|

|
- Zoom: Alternate between small and large sized Help window.
Electrode images may be quickly zoomed/restored by clicking inside the image. |

Example of Help window during a nerve conduction study. Wrist is currently selected site:

Example of zoomed Help window:

Example of Method description for selected Test:
 Show Method Description for Motor Median
Show All Electrode placement images included in PowerPack
Example of online Internet information for selected Test:

Example of Protocol/Strategy information for selected Protocol:
 Show Protocol/Strategy Description for Polymyositis
Example of Transparent Help window:

Click

to start the PowerPack main menu.
It is found on the Desktop, Start-AllPrograms-PowerPack and on the system tray usually in the lower right area of the screen.

The main menu offers options to adjust the behaviour of the Help window:
 Autostart PowerPack with Windows:
PowerPack will be automatically started when the computer/EMG system is powered on.
If this option os unchecked, PowerPack must be started manually by clicking on the

icon
before the EMG system application is started.
Help system active:
Deactivate the Help window.
Hide Help window if no Help available:
If not help information is available, the Help window will be hidden.
Transparent Help window (one only):
One Help window (non zoomed) will be transparent. This allows positioning of the Help window above for example the oscilloscope and still be
able to see the curves. The Help window will be opaque when the mouse is above the window.
Help Window active in:
Select in which Kepoint.Net tests/programs the Help window shall be active.
Click [OK] to minimize the Options dialog. Click

in the system tray area to access options again.
PowerPack includes a Nerve Conduction Data Summary Template that matches the selected parameters in all Signal Definitions.
Show example of a PowerPack NC Data report
PowerPack includes a Report Template that matches the selected parameters in all Signal Definitions.
Show example of a PowerPack Report
PowerPack may be modified in various ways to fit your needs.
Test Menu - Protocols names:
In Keypoint
®Net, use Options-Application Settings-PowerPack-Test Menu Design.
If Protocols names are changed, the HelpLinks.xml file
(see below) must be updated to keep the link to the Protocol Help information.
Test Menu - Test names inside protocols:
In Keypoint
®Net, use Options-Application Settings-PowerPack-Test Menu Design. Richg click on a Test inside a protocol - Edit - modify the Name.
Protocol test names may be modified without changing HelpLinks.xml.
Exception: The name of the nerve branches in Blink reflex must contain then texts "Supraorb", "Infraorb", "Mental", for the correct Help pictures to show.
Test Menu - Test names inside protocols:
In Keypoint
®Net, use Options-Application Settings-PowerPack-Test Menu Design. Richg click on a Test inside a protocol - Edit - modify the Name.
Protocol test names may be modified without changing HelpLinks.xml.
Special case: The name of the nerve branches in Blink reflex must contain then texts "Supraorb", "Infraorb", "Mental", for the correct Help pictures to show.
Reports:
In Keypoint
®Net, use Options-System-Report-PowerPack
NC Data summary:
In Keypoint
®Net, use Options-System-NCData-PowerPack
Replace Help information (Test, Method, Protocol):
Replace the image with another file. Note that the filenames must exactly match existing file.
See
(see below). for file location.
Replace Internet Help links:
Use a textfile editor, e.g. Notepad, and modify the file HelpLinks.xml.
See
(see below). for file location.
Multiple Help images:
It is possible to add multiple images and help information files by adding new filenames separated by semicolon in HelpLinks.xml.
If the HelpLinks.xml file is accidentally corrupted, delete it and it will be recreated at next startup.
PowerPack must be restarted for any changes in HelpLinks.xml to take affect.
If
Autostart with Windows is used, a computer restart is required.
| Files and folders - Windows 7/8/10 |
Purpose |
64-bit Windows: C:\Program Files (x86)\PowerPack
32-bit Windows: C:\Program Files\PowerPack |
Application executable files |
| C:\Users\[myName]\AppData\Local\Stalberg Software\PowerPack\*.ZIP |
Encrypted ZIP files used during installation.
|
| C:\Users\[myName]\AppData\Local\Stalberg Software\PowerPack\Method_* |
Method descriptions.
|
| C:\Users\[myName]\AppData\Local\Stalberg Software\PowerPack\Test_* |
Electrode placement images.
|
| C:\Users\[myName]\AppData\Local\Stalberg Software\PowerPack\Protocol_* |
Protocol descriptions.
|
| C:\Users\[myName]\AppData\Local\Stalberg Software\PowerPack\config.xml |
Program settings, including Help Windows position and size.
|
| C:\Users\[myName]\AppData\Local\Stalberg Software\PowerPack\HelpLinks.xml |
Connections between anatomy sites and corresponding Help information.
|
| Files and folders - Windows XP |
Purpose |
64-bit Windows: C:\Program Files (x86)\PowerPack
32-bit Windows: C:\Program Files\PowerPack |
Application executable files |
| C:\Document and Settings\[myName]\Application Data\Stalberg Software\PowerPack\*.ZIP |
Encrypted ZIP files used during installation.
|
| C:\Document and Settings\[myName]\Application Data\Stalberg Software\PowerPack\Method_* |
Method descriptions.
|
| C:\Document and Settings\[myName]\Application Data\Stalberg Software\PowerPack\Test_* |
Electrode placement images.
|
| C:\Document and Settings\[myName]\Application Data\Stalberg Software\PowerPack\Protocol_* |
Protocol descriptions.
|
| C:\Document and Settings\[myName]\Application Data\Stalberg Software\PowerPack\config.xml |
Program settings, including Help Windows position and size.
|
| C:\Document and Settings\[myName]\Application Data\Stalberg Software\PowerPack\HelpLinks.xml |
Connections between anatomy sites and corresponding Help information.
|
The 'AppData' ('Application Data' in XP) folder is sometimes not visible in you Windows File Explorer since it's a hidden system folder.
Use this procedure to make this folder visible:
Start - Control Panel - Folder Options - View Tab - select "Show Hidden files, folders and drives".
Now you may use a text editor to open HelpLinks.xml for editing.
- Keypoint®Net v2.32 or later
- Windows XP/7/8/10 or later
- Microsoft .NET framework, version 4-Full or later
- Internet connection for online Activation and Help