HISLink contains functions to
connect your EMG system with your Hospital Information System (HIS).
Two individual modules are currently available:
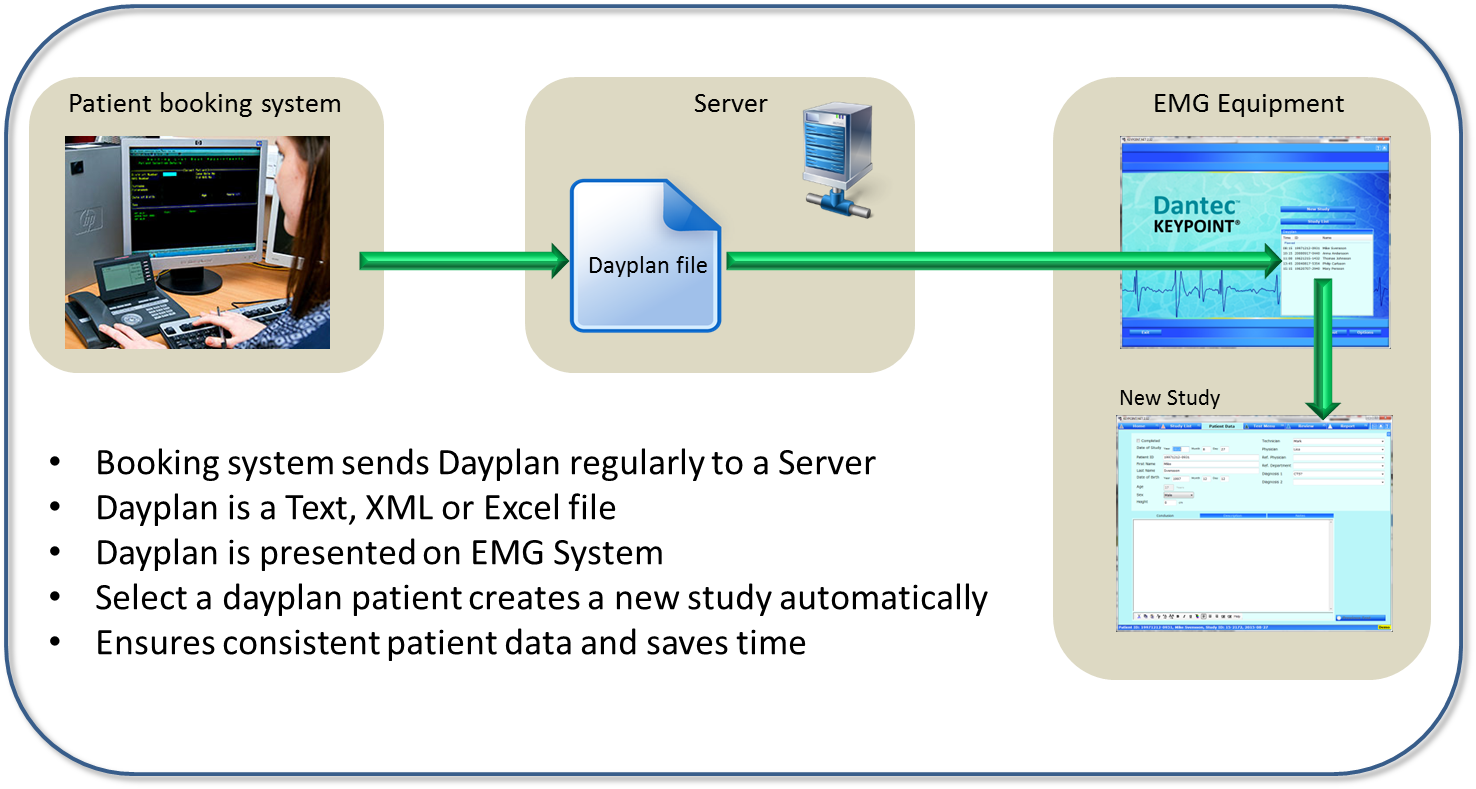
1) DayPlan
The DayPlan module allows you to select a patient scheduled for today, from a list shown on your EMG system.
When clicked, a new study is created and the patient details are inserted automatically.
This ensures patient data consistency, i.e. avoids typing mistakes and of course saves time.
This is how it works:
1) The booking system (HIS) automatically creates a file containing a list of todays patients.
2) This file is automatically placed on a server, accessible from the EMG system.
3) The DayPlan program will continously read this file and show the patient list.
4) When a patient is clicked, DayPlan will automatically create and start a new study.
2) ReportManager
The Report Manager module allows you to send PDF-reports created by the EMG system, to your hospitals medical record system (HIS).
This is how it works:
1) PDF-Reports are created and saved by your EMG System inside its database.
2) All patients within a specified time range and with an existing PDF report, are listed in the Report Manager window.
3) One or several reports are selected manually and then automatically sent to the HIS by the Report manager.

Some technical details:
- The reports are renamed to an identifiable name and placed in a specified folder where the HIS can read and import the reports.
- Output file name: PatientID_StudyID_versionNr.pdf. E.g: 19621215-1234_123ABC_1.PDF.
- If Dayplan is used, the StudyID part of the filename is the Study_ID_Optional field (see Dayplan formats) and can be edited.
- If DayPlan is not used, or a study is created manually, the StudyID part of the filename is the StudyID field which may be edited on the Patient Data page.
- If the output file exists, i.e. has not been removed by the HIS, the next free version number will be used. Max 10 versions are allowed.
- It is the HIS-systems responsibility to remove PDF files when imported.
- Only studies with PDF report(s) and study date within specified range are listed. Time range is defined in Options.
- The report list is refreshed when entering Home page and when pressing Refresh button.
- Successfully sent reports are highlighted in green.
- Reports not sent are indicated in red.
- There is no indication in the EMG system that the report has been sent to the HIS.
HIS Link is compatible with the following EMG systems:
The follow steps are required for a complete order, installation and activation procedure:
1) Enable Keypoint Integration Service
The Windows Service 'KeypointNET Integration Service'
is installed together with Keypoint.Net 2.32 or later, but must be activated for HIS Link to operate correctly.
Use the following procedure to start the Service and make it start automatically:
- Windows 7:
- Click Start
- Control Panel
- View by: Small icons
- Administrative Tools
- Services
- Right click 'KeypointNET Integration Service' - Properties
- Startup type: Automatic
- Start
- Apply
- Ok
- Close all Control Panel windows
2) Enable Microsoft Messaging Queue Service (MSMQ)
The Windows Feature 'Microsoft Message Queue (MSMQ)' must be installed for HIS Link to operate correctly.
Use the following procedure to install MSMQ:
- Windows 7:
- Click Start
- Control Panel
- View by: Small icons
- Programs and Features
- Turn Windows features on or off
- Expand 'MSMQ (Microsoft Message Queue Server)'
- Expand 'Microsoft Message Queue (MSMQ) Server Core'
- Select 'MSMQ Active Directory Domain Services Integration'
- Ok
- Close all Control Panel windows
3) Install the HIS Link application
- Note: Ensure to be logged in to Windows as the user who is going to use the program,
since the installation/activation is done per user.
- Visit Order and order the number of licenses you need.
- You will receive a Product Key in an email, required to activate the program.
- Download the HISLink installer package from Download
Many Internet browsers will warn about a downloaded installer file for safety reasons.
Confirm and accept to keep the downloaded file. In Chrome you need to click the 'Keep' alternative.
- Click on the downloaded file to start the installation procedure.
- Follow the screen instructions
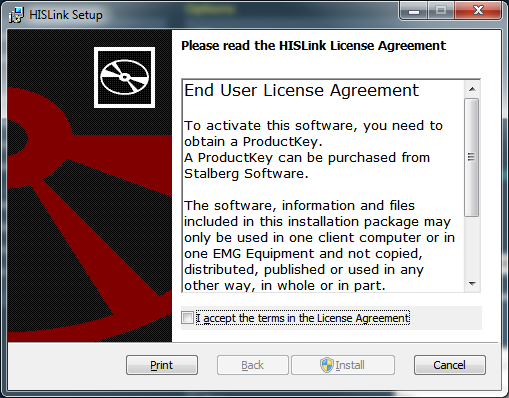
- After completed installation, HISLink is automatically started.
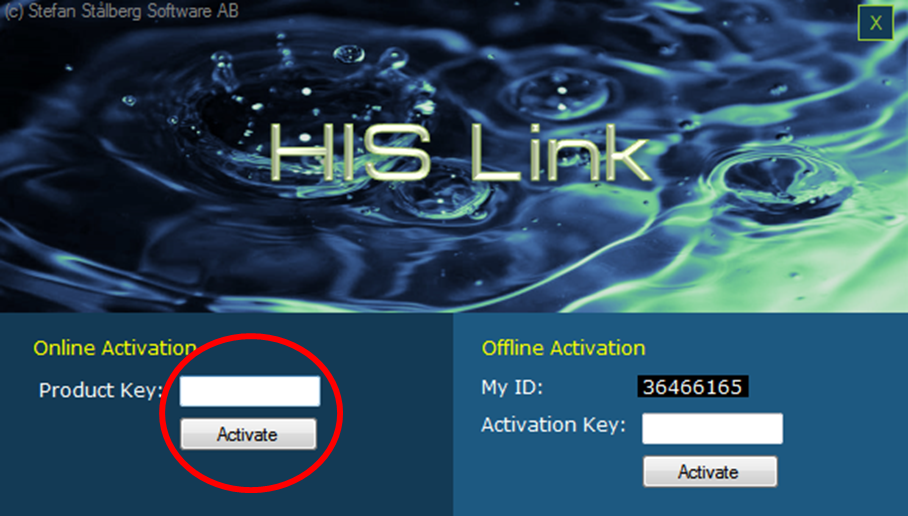
At first startup after installation, the Activation window is seen.
To continue, the program must first be Activated using either Online or Offline activation.
- Online Activation may be used if Internet is available.
Insert the Product Key you received from Stalberg Software, in the lower left area and click [Activate] just below.
- Offline Activation is used if Internet is not available from the computer where the program is installed.
- Visit Stalberg Software Activate page from another, Internet connected device.
- Insert the ProductKey and the MyID code manually and click [Get Activation Key]
- An Activation Key is shown.
- Insert the Activation Key and click [Activate] (lower right area).
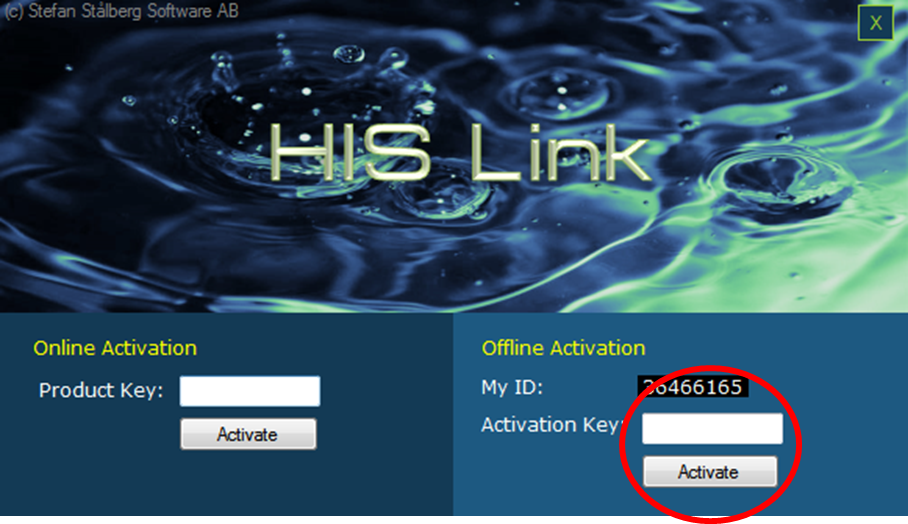
- If correct codes are entered, the program is activated and continues.
A ProductKey can only be used once.
An Activation Key is unique for one computer.
In case of hard drive crash or computer replacement, please Contact Stalberg Software for instructions.
4) Set Options
- Complete the Options fields, to customize your installation.
5) Prepare the EMG System application
To simplify the Report Manager workflow, please make sure the following settings are made in your EMG system:
- Enable and rename the StudyID field on Patient Data page.
This field will be used as part of the filename of the extracted PDF report.
If Dayplan is not used when creating a study, a StudyID code must be inserted manually.
Goto: Options - System - PatientData and select the 'Study ID' field. If preferred, move it up and down using the green arrows.
Rename the field header by double clicking on the 'Study ID' text in the 'Field label' column. Insert a new text, something like "HIS Ref" or "Ref Nr".
- Include the StudyID field in reports.
Goto: Options - System - Report. Modify each report template's Patient Data block to include the StudyID with the same field name as inserted above, e.g. "HIS Ref" or "Ref Nr"
This is optional, but recommended, to enable report tracking by HIS number.
- Report Manager column header.
Open the HISLink Options, and change translation of 'Study ID (HIS)' to the same text as on Patient Data and in the report, e.g. to "HIS Ref" or "Ref Nr"
- Ensure PDF report is created.
The Report Manager will only send PDF reports to the HIS.
To enable PDF report creation, goto: Options - System - Report. Select each report to be sent to the HIS, and make sure the '[x] Auto Generate PDF' is selected.
Patients without PDF reports will not be seen in the Report Manager.
The Options window is accessed by clicking on the desktop icon, or on the system tray icon:

The Options window:
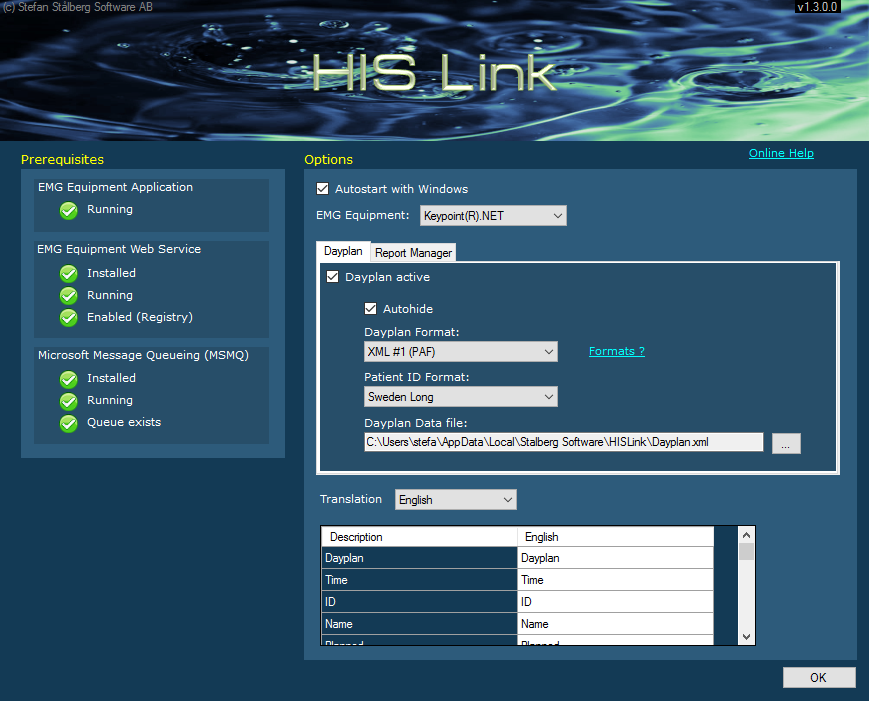
 Autostart with windows:
 HISLink starts automatically. If not checked, you must start HISLink manually from the desktop.
EMG Equipment: Select your model.
Dayplan Active: Enable/disable the DayPlan window.
Autohide: Enable/disable if patient names be hidden when the mouse is outside the window.
Dayplan Format: See below for currently supported DayPlan file formats.
ID Format: In many countries the personal ID code can be used to extract birth date and gender. In case this information is not provided in the DayPlan data file, DayPlan tries to parse the ID code to find this out.
Dayplan Data File: Click [...] and select folder and dayplan file name.
Report Manager Active: Enable/disable the report Manager window.
Autohide: Enable/disable if patient names be hidden when the mouse is outside the window.
Show reports created the last # days: Only reports created the last # days will be shown and selectable in the Report Manager window.
Completed Studies Only: Only studies marked as 'Completed' will be selectable in the Report Manager.
Reports destination folder: Folder where extracted PDF reports will be placed and renamed. This shall be the import folder read by the HIS.
Translation: Select language of texts to be display in the dayplan window. Text can be modified by click and edit the right column.
A number of Windows services and functions (prerequisites) must be installed and activated for HISLink to run correctly.
See
Installation for details.
In case any prerequisite is not fulfilled, a warning sign is shown on the tray icon, and the HISLink windows will not show.

Click on the icon to see the reason for the warning.

| Error |
Solution |
| EMG Equipment Application - not running |
Start Keypoint.NET v2.32 or later.
|
| EMG Equipment Web Service - Not installed |
Keypoint.NET v2.32 or later is required.
See Keypoint.NET KPIS Reference Manual.
|
| EMG Equipment Web Service - Not installed |
See section Installation:1, how to start the service. |
| EMG Equipment Web Service - Not enabled (Registry) |
The Registry key 'HKEY_LOCAL_MACHINE\SOFTWARE\Medtronic\ConnectivityServices\KPISAutomationEnabled' shall be defined and have the value '1'. |
| MSMQ - Not installed |
See section Installation:2, how to enable install MSMQ. |
| MSMQ - Not running |
Start MSMQ Service in Control Panel - Administrative tools - Services.
Set Start type to 'Automatic' and click 'Start'.
|
| MSMQ - Queue doesn't exist |
Manually create a message queue: Control Panel - Administrative tools - Computer Management - Services and Applications - Message queueing - Private Queues - Right click and add a new queue named 'kpintegrationservicesqueue'.
|
For more information and troubleshooting, see Keypoint.NET KPIS Reference manual.
Click Start - All programs - KEYPOINT.NET - Service Tools - KPIS - Integration Services Reference Manual.
The following DayPlan file formats are supported:
A XML file with the following structure:
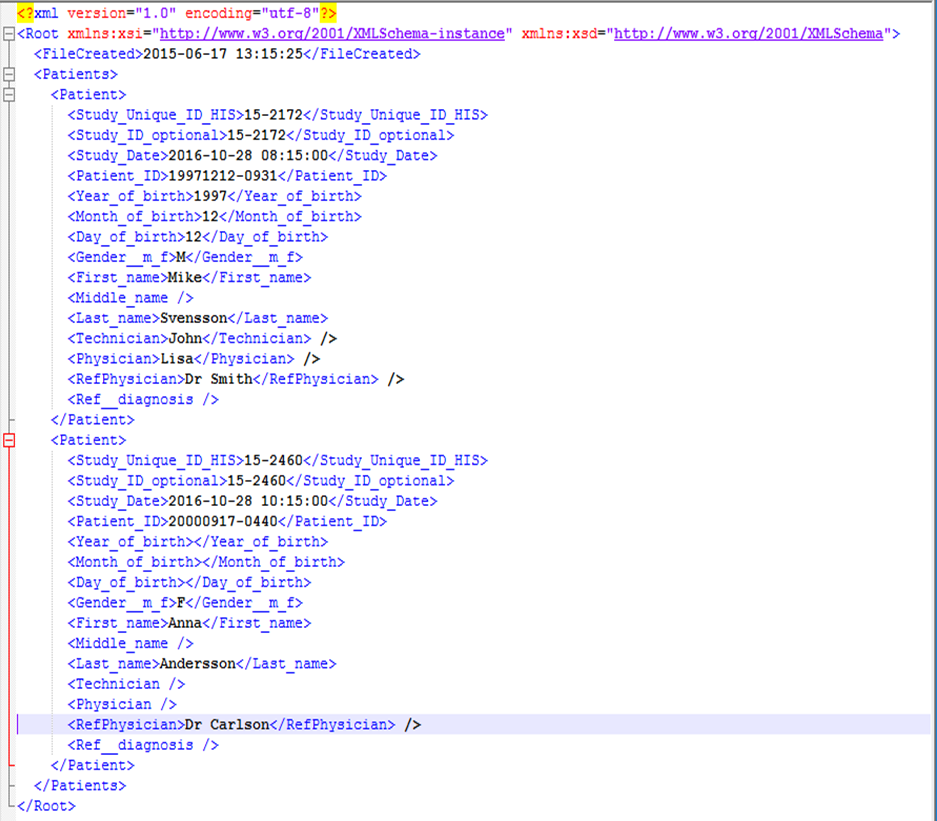 Notes:
Study_Date: Optional. Must have the format YYYY-MM-DD HH:MM:SS if used. If not available, study date is set to todays date.
Study_Unique_ID_HIS: must be a unique code. If not specified, a GUID is created by DayPlan.
Study_ID_optional: will be displayed under 'Study ID' in Keypoint.Net. Will be used as part of filename by the Report Manager. Not required.
Gender: m=male, f=female
2) "Text - row by row #1 (ProMan)"
A text file with the following structure:
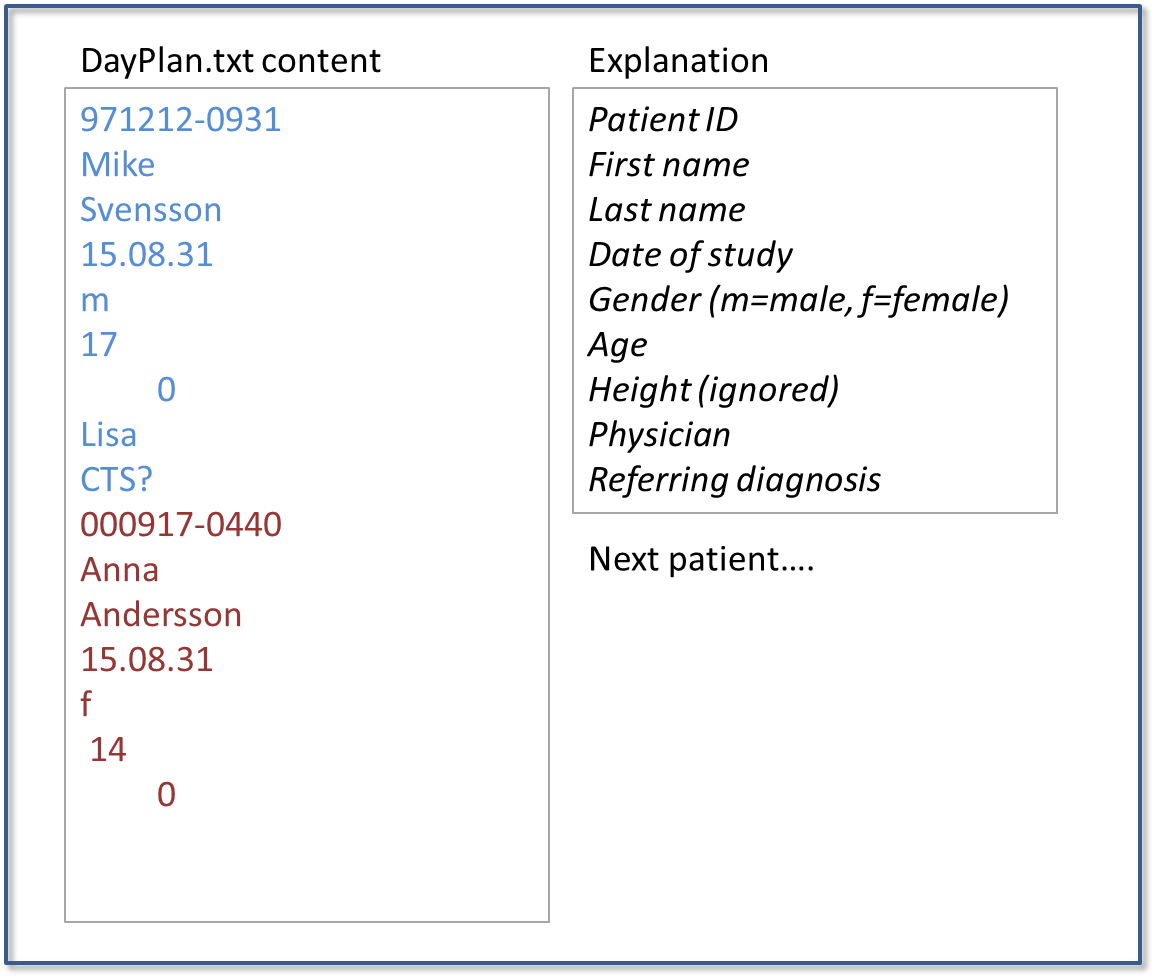 Notes:
Date of study: Optional. Must have the format YY.MM.DD if used. If not available, study date is set to todays date.
Study_Unique_ID_HIS: always set to GUID
Study_ID_Optional: always set to blank (""). I.e. StudyID must be edited manually to be used by Report Manager during report extraction.
Height: is ignored.
A XLSX file with the following structure:
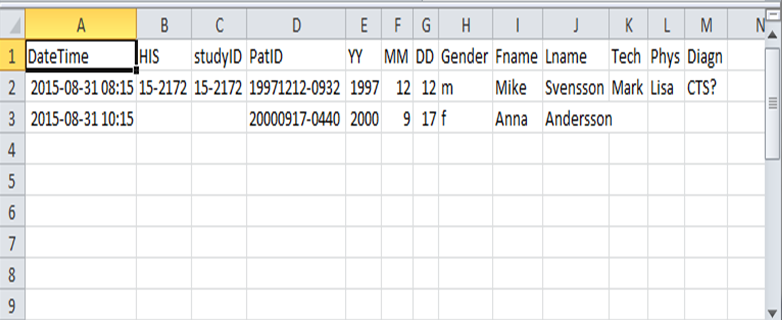 Notes:
DateTime of study: Optional. Must have the format YY-MM-DD HH:MM if used. If not available, study date is set to todays date.
HIS: Optional. Must be a unique code is used. If not specified, a GUID is created by DayPlan.
studyID: Optional. Will be displayed under 'Study ID' in Keypoint.Net. Will be used as part of filename by the Report Manager.
PatID: patient ID. Optional.
Gender: m=male, f=female
| Files and folders |
Purpose |
| C:\program (x86)\HISLink |
Application executable files.
|
| C:\Users\[myName]\AppData\Local\Stalberg Software\HISLink\Config.xml |
Settings files, holding current Options.
|
| C:\Users\[myName]\AppData\Local\Stalberg Software\HISLink\ |
Suggested location for the Dayplan data file.
|
- Windows 7/8/10
- Microsoft .NET framework, version 4-Full or later
- Keypoint.Net 2.32 or later
- Keypoint.Net Integrations Services (KPIS)
- Microsoft Message Queuing (MSMQ)
- Internet connection for online Activation and Help